Showing posts with label Tutorial. Show all posts

Saturday, January 3, 2015

Terracotta jewellery making and baking - Tutorial


On seeing the beauty of the terracotta jewellery sets on the net, I wished to make one. Making a set is  easy for me but baking process is something difficult. Many said to bake it in an oven or kiln, I don't have either.

 One lady in a television program said to bake it in microwave oven. Hey... I have a microwave.
 So I made a jhumki  and pendant and  baked it in microwave... but it was a disaster, it busted. Then I keep on searching the net and finally got one tutorial.

 This time I kept the designs very simple since I am not sure about the out come. I don't want to waste my efforts. But  it was a success. It really worked and I made my first terracotta jewellery set.

 Thanks for the person who shared this. I can not find that link now but the tutorial in this link also uses same technique.
You can go here and check for the tutorial
Edited: All details about making, baking and painting terracotta jewellery is here....

https://www.youtube.com/playlist?list=PL9P99TIJ7qgzPlgo-nrSwkqR2cimaF9zL


I baked some small pendants and beads and made a necklace, earring, bracelet for my daughter and a jhumki for me. I love jhumkis...I like the way they dangle. Waiting to make many such lovely jewelries . 

Edited on 6/4/15
Another link for baking tutorial....
http://ladiescampus.com/learn-how-to-make-terracotta-jewellery-pendant-making-part-2-a-baking-firing/


Monday, November 28, 2011

Banded yoke top/frock tutorial


The draft contains two part, the yoke and the body. It is open at back for easy in and out. It is easy to make. Any one who knows how to finish a neck line can make this top/frock. Here I have made a frock, to see how the top looks click here.


Take a basic draft for top.


Measure the shoulder, here it is 2.5 inches.
Mark a band around the neck with the width 2.5 inches as shown in the picture.
  
Cut the band, this is the yoke and the other part is the body. Preserve the body part we need it later.


TO MAKE THE YOKE


FIGURE-A 
(click to view larger)
  1. Fold the yoke as shown in the picture. Keep the yoke on fold(4 layers, this will result 2 yoke pieces).
  2. Mark it with 1/4 inch seam allowance.
  3. Cut it.
  4. This should result an oval as in the picture
  
FIGURE-B
(Click to view larger)
  1. Keep the pieces such that right sides faces each other and stitch along the outer edge as in the picture.
  2. After stitch the outer edge, the yoke band looks as in picture 2
  3. Make  some  cuts along the outer edge.
  4. Turn the band to the right side and press it. 
FIGURE - C
(Click to view larger)
Follow the figure C to fold the yoke and find the center part at the back side of the yoke. Cut it, it is the open at the back for button or zip. The yoke is now ready.


TO MAKE THE BODY


Breadth of the body=Chest+Extra inches for
                              pleats+ seam allowance
Height= as you wish

If you are going to make a top, 3 inches for pleats is enough, here I am making a frock so I have taken 6 inches (Note note the draft is placed on folded material so 6 inches means 12 inches)
Therefore the,
breadth= Chest+12 inches+seam allowance
Hope I am clear....Make the back in the same way.


Finish the armhole with bias strips.


I have used box pleats in the front(you can also use knife pleats) and knife pleats at the back. Cut the desired length at the center of the back piece for open


 The body is  ready.


 Now we have to attach the yoke with the body. Stich the yoke such that it overlaps the body.


I have  made some running stitches instead of using pins. 

Join both the front and back with the yoke.


FIGURE-D
  1.  Attach the back and front with the yoke.
  2.  Finish the back opening..
  3.  Finish the neck with piping or as you wish.
  4. Stitch the button holes and buttons.(sorry the numbers 3 and 4 should be interchanged in the figure)


The dress is almost ready. Join the sides and add ruffles if you wish.
 I have added some lace in the neck line and decorated the yoke with small crochet flowers and beads


NOTE:
  • Material requirement( for 41/2 yrs old)
    yoke: less than 1/2 meter
      ( you may require more material if you making ruffles
       with the same material)

      body(skirt):1/2 meter
  • You can decorate the edge using lace instead of ruffles.
  • Instead a 'back open', you can make it at the shoulders.
  • You can use an interface, if you want the yoke to be more stiff.
Hope I am clear and if you have any doubts feel free to ask me. Thank you for your wonderful support and comments, it drives me to create more. Meet you soon...

I am linking this to the parties here


Update:
Featured at


They are talking about me at CraftGossip.com
oneprettything

Thursday, September 15, 2011

Shirred dress/top tutorial

Last week I made this shirred dress for my dd. You can make this in just half hour time. No pattern...no draft... easy. I am sharing it with the photos, so that you can make one if you wish...


Take the fabric piece of breadth 40 inches(double the chest measurement) and length as you wish.


Hem the edge...


Fold the other edge twice and press. You can make a stitch over it if needed, but I have not.

Now, the shoulder straps...


Take a strip of cloth 4 inches wide and 18 inches long.
1. Fold it and stitch along the side.
2. you will get a fabric tube
3. Turn it inside out.
4. Press it.
5. Cut it in to two equal parts, the shoulder straps are ready.

Pin the shoulder straps to the dress (at the edge folded and pressed) as shown...


To attach the shoulder straps, fold the dress, mark 5 inches from the sides and pin the straps...Do the same for the back side also.


I have marked lines to make my stitches straight. I have stitched 5 lines from the top each 2 inches apart. you can decrease this to have more shirring.

Now load your bobbin with the bobbin elastic and first stitch the top most edge where we have attached the shoulder strap.


Stitch the other lines in the same way... Join the sides...
And the dress is ready to wear. Isn't it so simple?


Variations:
* If you don't have enough cloth then you can cut two pieces, back and front.
But join them before you stitch the hem, to get a neat finish.

* You can reduce the length and make it as a top,to match legging or even a jeans pant

* You can add ruffles or laces to the hem to enhance its beauty.

*While shirring don't forget to back stitch  at the beginning and at the end to secure the stitches.


Hope I am clear with the steps, if not feel free to ask me ...
Next post will the banded yoke top tutorial, so keep watching...
Thanks for the lovely comments you give me.
I am linking this to the parties here


Update:


Featured at


They are talking about me at CraftGossip.com
oneprettything

Thursday, September 23, 2010

Jeans skirt

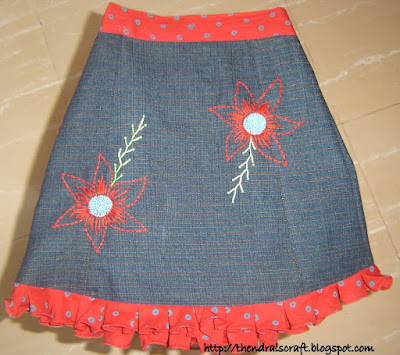
I always love reusing. Once in a magazine I learnt about making hand bag from jeans. Having an idea to do so, I was  collecting  jeans from  my husband and brothers....but for hand bags I should attach zipper. I hate those zippers. Once I added zipper to the crochet bag(Do you remember else click here.), it was really very difficult to me. Even while making dresses I will always go for other options than zippers. So no hand bags, then what shall I do with those pants( cannot throw it because the efforts I took to preserve them are very great....keeping them very safe so that my husband never have a chance to look them...he call them  'clutters' and always ready to throw away). At last I made a  skirt for my daughter.

The draft I used is very simple A line pattern but used panels.


Along with the jeans, the other material is cotton(remaining material after stitching my salwar).
Cut the panels, join them. you can use the wrong side of the jeans if the color is faded.

To add frills at the end, cut straps....


    join them....

 
 hem it along one side....


 make pleats and attach to the skirt or directly make pleats while joining it to the skirt. I have used rolled hem and box pleat.  


Join the sides. Attach waist band. The skirt is now ready.
Zipper is suitable for A line skirt, but I have used elastic.


Embellish the skirt as you wish.

 I did some hand embroidery and added beads to improve its look.
Embroidery details......


I am also making a top for this skirt, it will be the next post.

Update
The link to the top is here

Linking this to